Showing posts with label stars. Show all posts

Wednesday, February 12, 2014

When you Wish Upon A Star

It has been months since my last update. I apologize sincerely. Holidays and living in a separate state than my husband is anything short of distracting. I promise I will try to do much better this year.

So what do I have for you lovelies today?

Wishing Stars!

For the new year, my girls and I decided to make Wishing Stars. Now these are the same as the origami Lucky Stars, but I thought why not make a wish, write it on the inside and make it a Wishing Star? At the end of the year we are planning on opening the stars back up and see if our wishes came true.

 We made ours with left over holiday Christmas wrapping paper, and yes, before you even ask, this stuff get's glitter everywhere. But we're a glitter, sparkle, fantastical kind of family, so no harm. ;D

Now I cut my wrapping paper into strips about 2 inches x 40 inches. This way I had larger stars. The paper itself is rather thin, so you may want to back it with another layer of paper, perhaps kraft paper or something slightly thinner just to give your star some stability. (Trust me, your stars will puff better if you have a slightly stiffer paper.) You could always add about 20 inches to the length as well and it will achieve the same purpose.

So supplies needed:
  • scissors
  • wrapping paper, or kraft paper, or even star paper (if you want small stars) these can be found all over, but I like to order some of my pretty star papers from here plus they have glow-in-the-dark. (I love Etsy don't you?)
  • Ruler. - I used a quilting ruler due to length, and the fact that I had it handy, but this is not a necessity.
Steps: (after paper preparation...cutting strips)

Now I'm not going to try and re-invent the wheel to much here. A fabulously easy tutorial for these stars can be found here. I am enclosing a few photos though of my own, to give a quick tutorial if you don't feel like clicking through to a different site.
  1. Write your wish on the back of your paper strip.
  2. Tie paper in a knot. WHAT? I know, this part can be a little tricky. Don't pull to tight, just get it to where the edges line up, and then smoosh (technical term). Flatten out the paper and you should have a pentagon shape. Try to keep the knot off to one side, and just fold the extra in the back over, you'll wrap it up later.
  3. Now begin wrapping over...
    4. and over...
    until you are left with about this much of a tail.

5. Tuck the tail under the V shaped opening like this. Continue to slide the paper into the star until snug.
 6. Last but not least press the sides of the star in towards itself gently. Your star should begin to puff up and you will be left with a puffy star.


Simple right? (Don't worry if you don't get it correct at first, it took me a little bit of practice before I figured it out on the small paper let alone jumbo sized).

Good luck with your stars. <3


Sunday, May 15, 2011

30 Day Challenge

So first. Let me apologize for forgetting to post reminders about the upcoming 30 day challenge. Plus I fell off the boat in posting my own creations. So today you get three times the photos. :D Also, the rules of this particular challenge can be found under the challenges and contests page.

Day one: Unfortunatley, not the most creative for me, I worked on some rough sketches for my Army Ants book, that is with an agent. Hoping to get the sketches done before their book conference in New York, but I don't know if it is going to happen. I'll keep my fingers crossed. So here is a photo of day one's creativity.


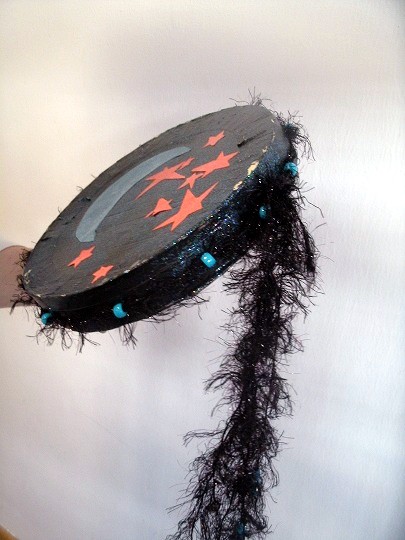
Day Two: Resulted in much more creativity, even if my husband says I cheated because I helped my daughter on a project. It's still being creative. : )~  We made a tamborine out of recycled pizza boxes, and a soda box. Then filled it with beans to rattle. Painted it black, my daughter cut out a moon and star shapes, then we sealed the whole thing with a coat of Sparkle Mod Podge. Tied some eyelash yarn around with beads, and that's that. See the photo below.


Day Three: So far my favorite day. I created a hat, for a surprise I am planning for next Mother's Day. I know that is a way's off, but I figure maybe if I begin planning it now, I will have everything ready within a year. LOL. So I began with a plain white velor plastic party top hat, I had left over from my girls Un-Birthday celebration. I cut circles from masking tape for the bubbles and then sprayed the hat with Ritz fabric dye in green and blue. Then removed the masking tape circles once the dye had dried. I had my daughter show me how to create tissue paper flowers (Because it has been to long for me since elementary and I forgot how to make them), then added ribbon. Presto chango, boring white plastic hat, to tea party worthy hat.


I hope you enjoy my first three days of creativity. Please feel free to share what you are creating. Oh and just a P.S. I am considering doing a how-to possibly on you-tube, or even step by step by pictures. If there is any interest. Please let me know, as I would love to share my creative insanity with you. It can be contagious if exposed to the right elements.

You may like...